Monday, January 31, 2011

Valentine's is almost here!

Hey everybody!  Just a quick note to let you all know I am still here!  I didn't get much crafty stuff done last week.  Alyssa battled a stomach bug all week long :-(  Thankfully she is finally over it and so far everyone else has stayed well!

I have almost finished my evening dress refashion that was mentioned in this post.  I can't wait to show off the results!  I have had a lot of fun with it and am very pleased with how it is turning out!!

Valentine's day is just around the corner!  The wheels in my head are in overdrive right now trying to figure out the perfect dress to make for Alyssa :-)  Her granny gave her some super cute red sparkly shoes this weekend (which she LOVED) I just now need to make the perfect dress to go with them :-)

I don't know if you remember the dress I made her last year (with the matching skirt for me).  I thought I would share pictures again :-)


Oh she has grown up so much over the past year!!

Hopefully I will be back soon with pictures of an adorable Valentine's dress for this year! :-)

Tuesday, January 25, 2011

Getting Ready for Las Vegas!

My husband's national sales meeting for the company he works with is going to be in Las Vegas this year in a couple of months!  I have been given the opportunity to meet him up there- whoo hoo!!

I thought it would be fun to make some fun outfits for my trip!!  I made an outfit yesterday but couldn't get good pictures of me in it (it is SO HARD to photograph yourself - almost impossible!) So I thought I would just have to wait until I actually wore the dress and got someone else to photograph.

But - I found another way! :-)  The night that I fly up there is the night of their awards banquet - meaning I would need something nice to wear.  I have several after-five dresses that don't fit, and since I have started this whole refashion thing, decided that I could refashion them!  :-)  But in order to do that I was going to need to use my body double dress form.  I have had it for quite some time but for some reason don't use it as often as I should (but probably will alot more now)

Anyways - all that to say that when I pulled it out I realized that I could use it to get pictures of my other outfit! I don't like pictures of dresses on dress forms quite as well as them on people - but you gotta do what you gotta do!

So here is my dress I made yesterday!


I got the idea from this link.  The main difference is the fact that I lined it.  I used a cream colored muslin, sewed the sides of the main fabric together and then the sides of the lining together.  Then I put the two together, right sides facing, and sewed the bottom hem.  Then flipped it and topstiched the bottom hem and then sewed the armholes and then turned down the top band like stated in the directions on the other link. By adding the lining I did not worry about having to serge any edges - I had no exposed edges.  (In fact the dress is actually reversible which has got me to really thinking about some future projects!)

This dress took only about 1 1/2 hours from start (as in getting measurements and marking out a pattern) to finish!!

Also the top link didn't give full instructions, even though it was super easy to figure out.  I didn't catch on though that your cord for the top was one long piece that only tied on one side.  I used two pieces so that I had ties on both sides.  I think I would have preferred only having a tie on one side.  I will have to remember that for next time.

Anyways, I love how versatile this dress is.  There are many different things you can do to it.  Here are some pictures of ways I have thought of.
 Add a belt!  I love the slimming effect that has.  (of course you have to wear the boots too - I wished they would have come out better in the pic)
 Add a denim jacket to complete the cowgirl look :-)  This is how I wore it to go show my hubby.  His reply "well hello cowgirl" with a great big smile!  He liked it!
 It is also very cute with a short sleeve denim shirt (probably how I will wear it in Vegas...it will be a couple of months from now so probably too warm for the jacket)
 A close up showing the dainty flower print on the fabric.  I think it is very pretty with the denim!

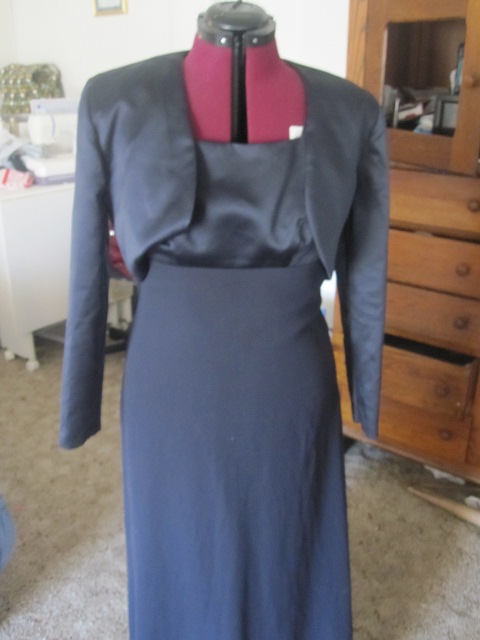
And, to give you a peek - here is the dress I am fixing to refashion!  This dress has a lot of special meaning to me.  My husband bought it for me the Christmas we were dating.  My Christmas present that year was the dress, jewelry and tickets to a show!  (yes he was quite romantic and still can be at times today!)  He picked out the dress too!  I loved it and still do but it no longer fits!  :-(  I gained quite a bit of weight since then and even though I have lost most of it, after three kids my body is just a different shape :-(

Anyways - I have a fabulous idea in my head to refashion it! I just hope and pray that I can make it work!

Here's the dress.
 (sorry - my camera got fuzzy on that picture...but I still think you get the idea - floor length midnight blue)
 It will only zip up halfway :-(  (and this is where the zipper stops on me when I have it on so that is a very good indication that I have my body double set to the right measurements!)

It also came with this jacket - with very tiny arms (they were even tight then)...don't know if this jacket will play a part in the refashion or not.

I will try to remember to take pics along the way of the process and will hopefully have a future post of a cute new dress!!!  (keep your fingers crossed!)

Wednesday, January 19, 2011

Another Ruffle Shirt for Mommy!


I had so much fun with my ruffle shirt yesterday that I thought to try some more! :-)  (I have several shirts to refashion...I did one today).  Today I decided to try my own design :-)  I had in mind kind of what I wanted and just went from there, piecing it as I went.  I was very pleased with the results!

I started with a long sleeved white t-shirt that fits but has stains on it.  I was going to make it short sleeved but when I laid it out to see everything I noticed a hole in the shoulder seam. Oh well, I just made it a tank top instead :-)

To make the ruffles I had a white jersey knit pillowcase.  I have had it forever...don't really know where it came from because I don't have any matching sheets LOL but for some reason have just held it in my drawer.  I guess it was just waiting to be transformed into something fabulous!!  :-)

I made strips 4 inches in width and as long as the side of the pillowcase (don't know what that measurement was, sorry).  I marked lines on my shirt with my fabric chalk starting at the armpit area and then every 3 inches down.  I gathered my strips and and pinned them on the lines and then sewed them on.  I started at the bottom and sewed up.

Here is a picture of the middle of the process.  You can see a couple of rows sewn on the bottom and if you look really really close you can see the light blue lines on the shirt.


When I finished all the rows I knew I needed to do something to finish off the top.  I decided to make flowers to put across the top.

I used the instructions from this ruffle shirt post (her instruction for the corsage) and put a row of 6 flowers across the top of the top ruffle!

I was really pleased with the results.

Here I was trying to get a picture myself.


And then decided I needed help so I got my hubby to help.  I told him not to worry about my head because I would cut it out...he told me that my online friends need to see my face...oh well...here it is.  And look Alyssa saw a camera and had to get in the picture :-)

Tuesday, January 18, 2011

My Ruffled Shirt!!

Ever since I found the blog Tea Rose Home about a week ago I have loved looking through posts on it!  Her creations are just stunning!!   And ever since I viewed this post on there on the ruffled shirt she did I was bound and determined to make one for myself!

Well I made one today!  I realized that I had the perfect shirt to refashion in order to make this ruffled shirt. I have this long sleeved red t-shirt.  It was a t-shrit that I had back before I lost all the weight.  In fact i wore this shirt through all 3 pregnancies!  So, needless to say, it is a tad bit too big (about 3 sizes too big).  But for some reason I have hung on to it.  It has just been sitting in my closet!  I guess it was waiting for me to change it into something fabulous!!  :-)

I unfortunately forgot to get before pictures and am really kicking myself for it because the shirt made quite a transformation!

I took a t-shirt that fits now and used it as a guide to figure out what I needed to do with the red shirt to make it fit.  I cut off the sleeves completely and made it into a tank top.

I did all my alterations and then made sure the new tank top fit - and it did - like a glove!! YAY ME!!

I then used the sleeves that I cut off to make all my strips for the ruffles.  I pretty much followed the tutorial on the other blog to the t (here is the link again) so I will let you go there and get instructions if you want to do this yourself!

Here are some pictures of the finished project.  (sorry they are not the best quality - it is really hard to photograph yourself.  I tried to get my 5 year old to help but that just wasn't working)

Here it is with a cardigan...how it will be worn during the cold months!


Here's the shirt by itself.

Sunday, January 16, 2011

Mine and Alyssa's new skirt

My poor little Alyssa was sick this week with pneumonia.  This meant we spent a lot of time at home!  She was very clingy most of the week and I wasn't able to get much done but towards the end of the week she was doing better and I decided to tackle a new sewing project!

I had a whole bunch of a beautiful light brown corduroy fabric that I needed to do something with.  I have been doing a lot of looking online lately for sewing ideas and sewing patterns and stuff and found some to work for this corduroy!

I was really happy with the results!  And I was super happy that Alyssa was doing well enough to go to church this morning so we could show off our new skirts!!

I got the idea for my skirt at this link and for Alyssa's skirt at this link.  I really really liked the flowers that were on the skirt at the link for Alyssa's skirt and thought they would be fun to put on both of our skirts!  (In fact that website has quite a few ideas that I want to try out!)  I also made Alyssa a matching hair bow!!

Here is some pictures of the finished project.

Alyssa's finished skirt:


Mine and Alyssa's finished skirt:

Alyssa's hair bow:

Alyssa and I ready for church in our new outfits!

Seth took this picture of Alyssa and I :-)  (Alyssa always has that expression when Seth has the camera LOL!!)

Alyssa modeling her new outfit!

so whatcha think?!?!?

Monday, January 10, 2011

Alyssa has new pajamas!!

My poor baby girl is sick :-(  But I just made her happy!  I just presented her with a new pair of pajamas that I made her!!  It was of course another refashion project.

You see I got a pair of pajama pants for Christmas that my husband just thought were plain hideous. (Sorry Mom)  They were a pair of fuzzy fleece pajama pants that had tinkerbell all over them.  I tried to wear them Sunday when it was bitterly cold (and it wasn't even to bed...just to lounge around the house) and he gave me such a hard time about them.

But Alyssa, on the other hand, loved them!  She loves soft fuzzy stuff and she LOVES and ADORES tinkerbell (she calls her beebell).

So that gave me an idea - what if I could take these pants and make them into pajamas for her.

Here's a pic of the pajama pants and the sleeper that I used to make a pattern.  (this is a sleeper that she is currently fitting in so I couldn't cut it for the pattern - just had to use it as a guide)


I used the sleeper as a guide and cut out all my pattern pieces and then sewed it together.  I used the bottom of the pajama pants as the bottom of the sleeper (so that I didn't have to hem an edge...and I decided against trying to to put the feet portion in the sleeper).

I used the waistband of the pants as the bottom of the sleeves (once again so I didn't have to hem the sleeve edge.

Here is the finished sleeper!
The blue ribbon down the middle was to cover up a mess up.  I attached the zipper my favorite way where you baste the opening closed, then sew on your zipper and then rip the basting.  Well, this is very fluffy fleece and seams get hidden in the fleece, even basting stitches.  There were a couple of times that the seam ripper ended up ripping thread from the fleece instead of the basting thread.  Therefore it created a small hole. But I attached the ribbon with a decorative stitch to look like it was meant to go there :-)

Here is my precious baby girl modeling her new pjs.  You can tell by her droopy eyes that she is not feeling good, but the pjs did bring a smile to her face :-)  (so you see Mom you just didn't realize at the time that you were buying another Christmas present for Alyssa!)


Wednesday, January 5, 2011

I Love Refashioning!

I found some more pictures of another outfit that I refashioned for Alyssa on my camera and noticed that I had not uploaded them yet!

Here was the original items – two very cute shirts that became too short.  The pink one had a ballooned hem at the bottom (and was originally suppose to be tunic length)

IMG_1933

I cut off the top of the pink shirt and noticed that it fit perfectly at the bottom of the green shirt to make a new dress with a balloon hem! 

Here is my cutie modeling her new cute dress!!

IMG_1977 IMG_1978

I am currently taking a break from Alyssa refashioning.  She has a pretty good wardrobe right now :-)  I have been working on baby items for my sister who is due in March :-) Unfortunately I cannot post anything about those yet because she is a reader of the blog.  I will have to wait until after her shower in February!  BUT I have taken pictures and can’t wait to post and brag on myself a bit :-)

I am also working on a new skirt for me!  I can’t tell you the last time I made something for me!  I am hoping to have it finished in time to wear to church on Sunday!

Related Posts Plugin for WordPress, Blogger...